Introduction
Here's the outline of our discussion. These pretty much summarizes the methods needed to integrate Amazon SES with MMIO.
Creating an Amazon SES account
Creating an IAM account and Assign permissions
Get the access key and secret access key
Enable the Integration in MMIO
Requesting Product Access to our chosen Region
If you are ready, then let's start.
1. Creating an Amazon Web Services account
To create an Amazon SES account, all you have to do first is go to Amazon Console (https://aws.amazon.com/console/)
When on the Amazon console page, click “Create a Free Account”

A. Create an Account
Open the Amazon Web Services home page.
Choose Create an AWS Account.
Note: If you signed in to AWS recently, choose Sign in to the Console. If Create a new AWS account isn't visible, first choose Sign in to a different account, and then choose Create a new AWS account.Enter your account information, and then choose Continue. Be sure that you enter your account information correctly, especially your email address. If you enter your email address incorrectly, you can't access your account.
Choose Personal or Professional.
Note: Personal accounts and professional accounts have the same features and functions.Enter your company or personal information.
Important: For professional AWS accounts, it's a best practice to enter the company phone number rather than a personal cell phone. Configuring a root account with an individual email address or a personal phone number can make your account insecure.Read and accept the AWS Customer Agreement.
Note: Be sure that you read and understand the terms of the AWS Customer Agreement.Choose Create Account and Continue.
You receive an email to confirm that your account is created. You can sign in to your new account using the email address and password you registered with. However, you can't use AWS services until you finish activating your account.
Tip:
For Email address, use a corporate email distribution list (for example, it.admins@example.com) or email box if your account is a professional AWS account. Avoid using an individual's corporate email address (for example, paulo.santos@example.com). With this practice, your company can retain access to the AWS account even when an employee changes positions or leaves the company. The email address can be used to reset account credentials.
B. Add a payment method
On the Payment Information page, enter the information about your payment method, and then choose Verify and Add.
Note: If you want to use a different billing address for your AWS billing information, choose Use a new address before you choose Verify and Add.
If you are signing up for an AISPL account, you must provide your CVV as part of the verification process. You might also have to enter a one-time password, depending on your bank. AISPL charges your payment method 2 INR as part of the verification process. AISPL refunds the 2 INR after the verification is completed.
Important: You can't proceed with the sign-up process until you add a valid payment method.
C. Verify your phone number
Choose your country or region code from the list.
Enter a phone number where you can be reached in the next few minutes.
Enter the code displayed in the CAPTCHA, and then submit.
In a few moments, an automated system contacts you.
Enter the PIN you receive, and then choose Continue.
D. Choose an AWS Support plan
On the Select a Support Plan page, choose one of the available Support plans. For a description of the available Support plans and their benefits, see Compare AWS Support plans.
E. Wait for account activation
After you choose a Support plan, a confirmation page indicates that your account is being activated. Accounts are usually activated within a few minutes, but the process might take up to 24 hours.
You can sign in to your AWS account during this time. The AWS home page might display a Complete Sign Up button during this time, even if you've completed all the steps in the sign-up process.
When your account is fully activated, you receive a confirmation email. Check your email and spam folder for the confirmation email. After you receive this email, you have full access to all AWS services.
Please watch the video below how to do it:
After you have created and activated your Amazon Web Services Account, it then time to create your User account or what they call an IAM account.
2. Creating an IAM account
To create an IAM Account, go to your Account dashboard.
Search for “IAM” on the search bar:
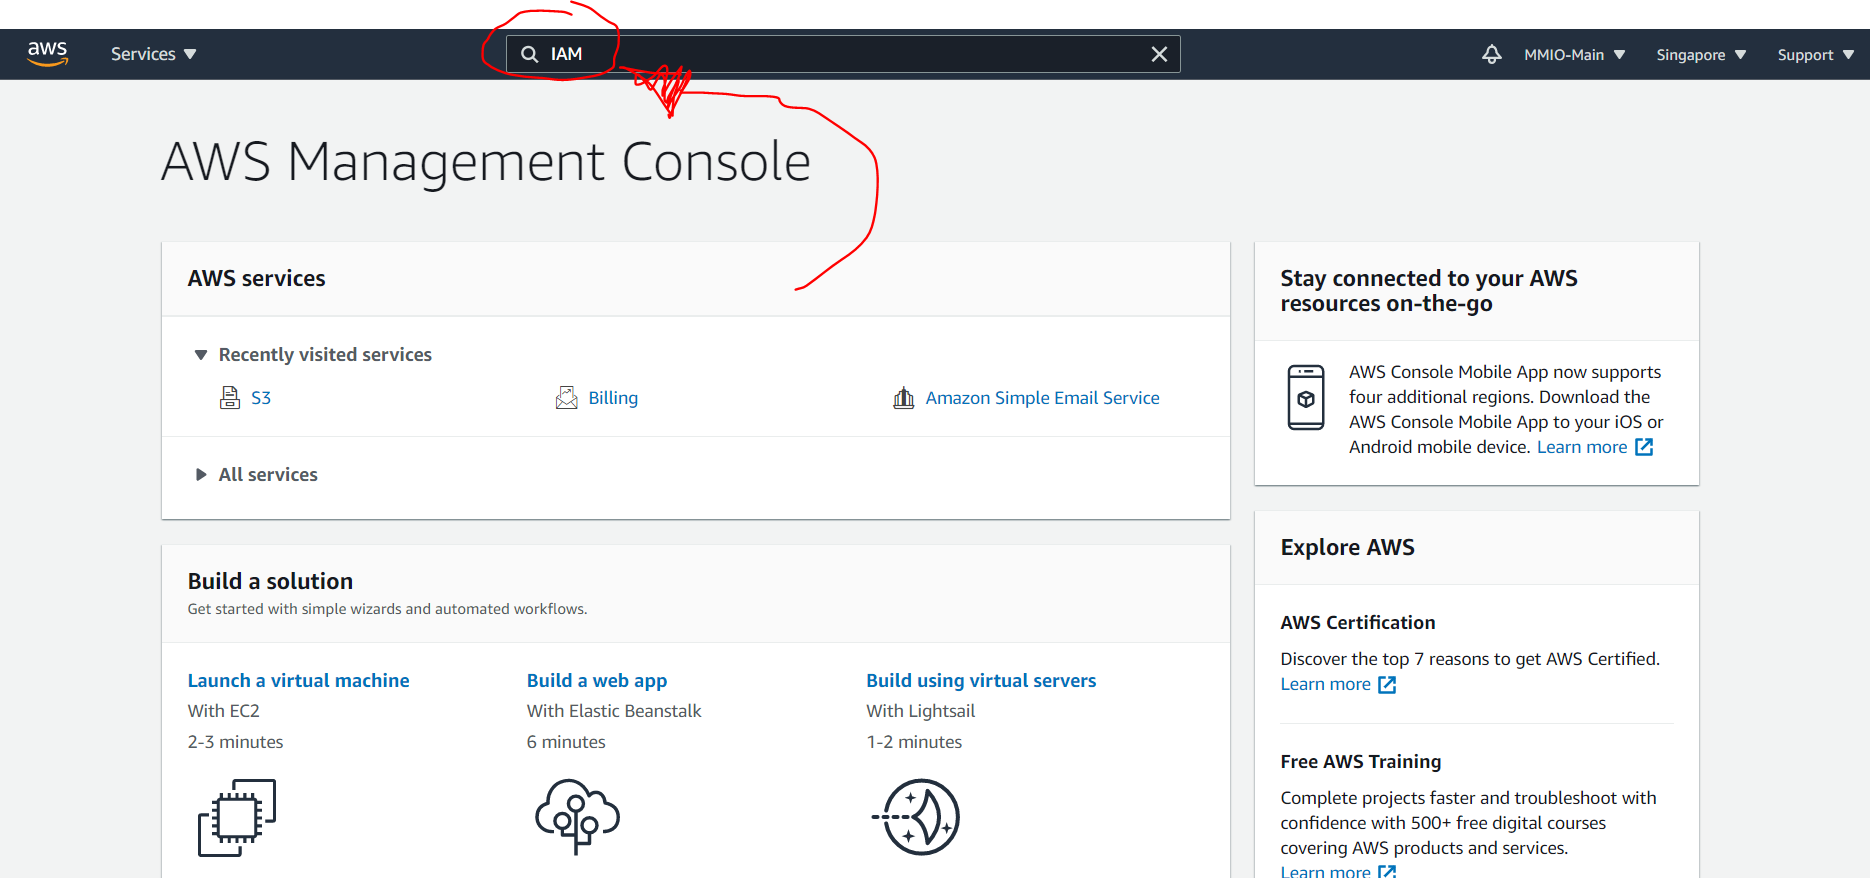
Then click the “IAM” link on the search results.
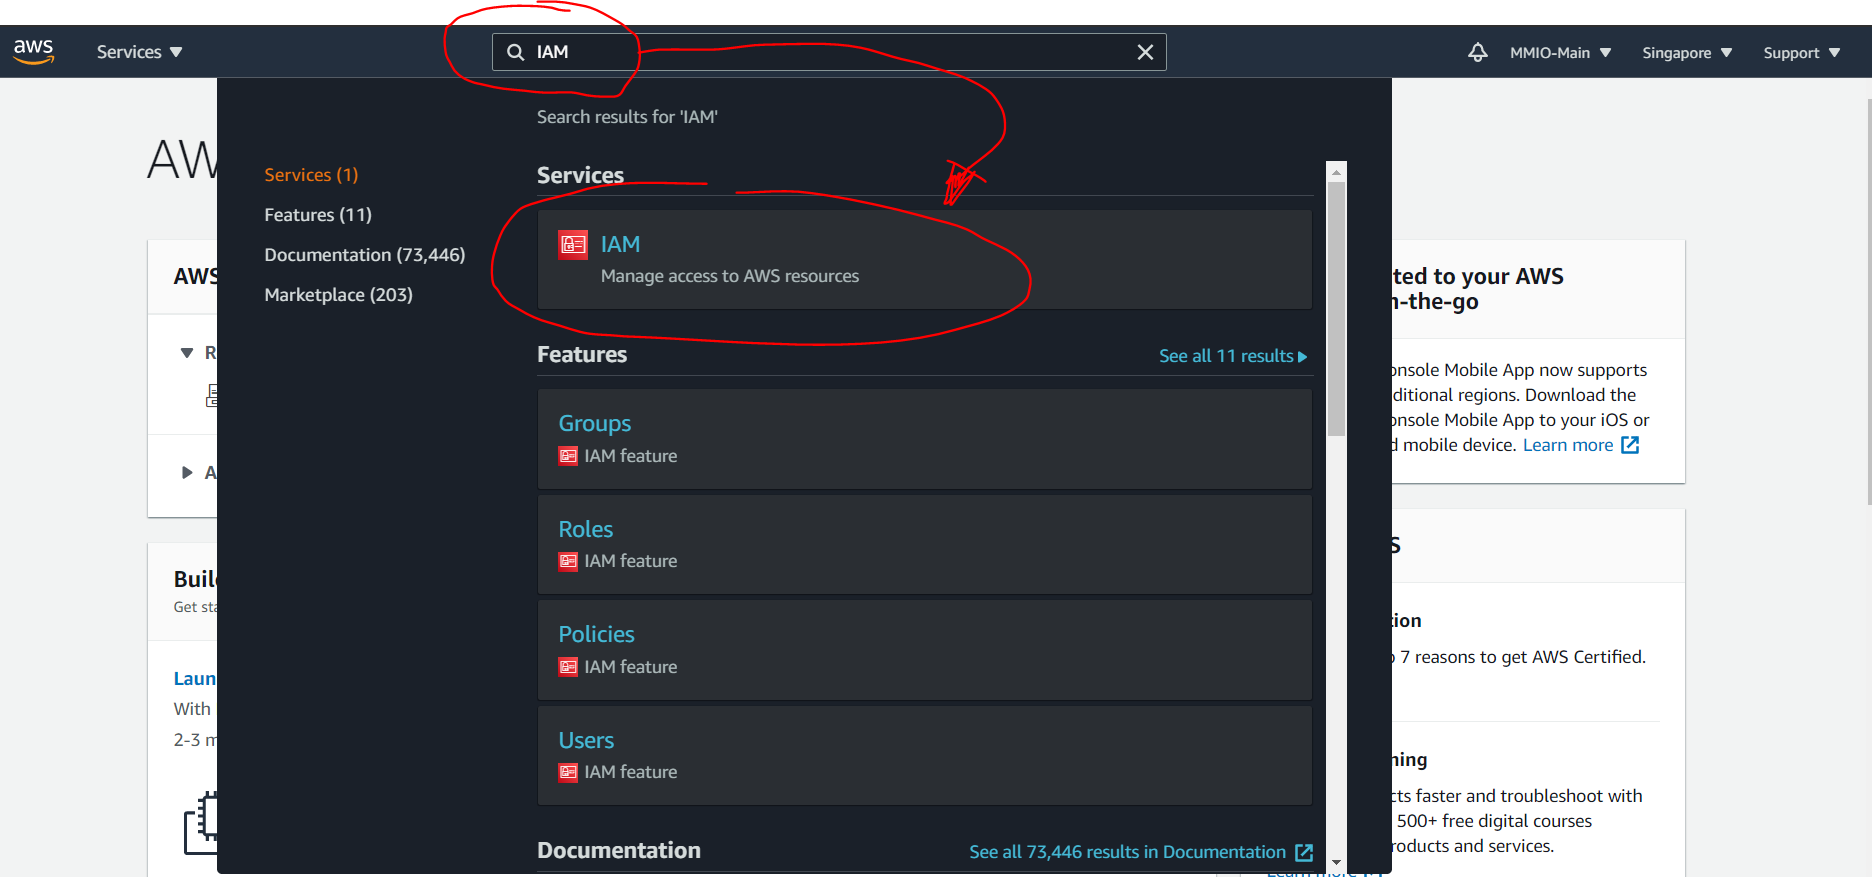
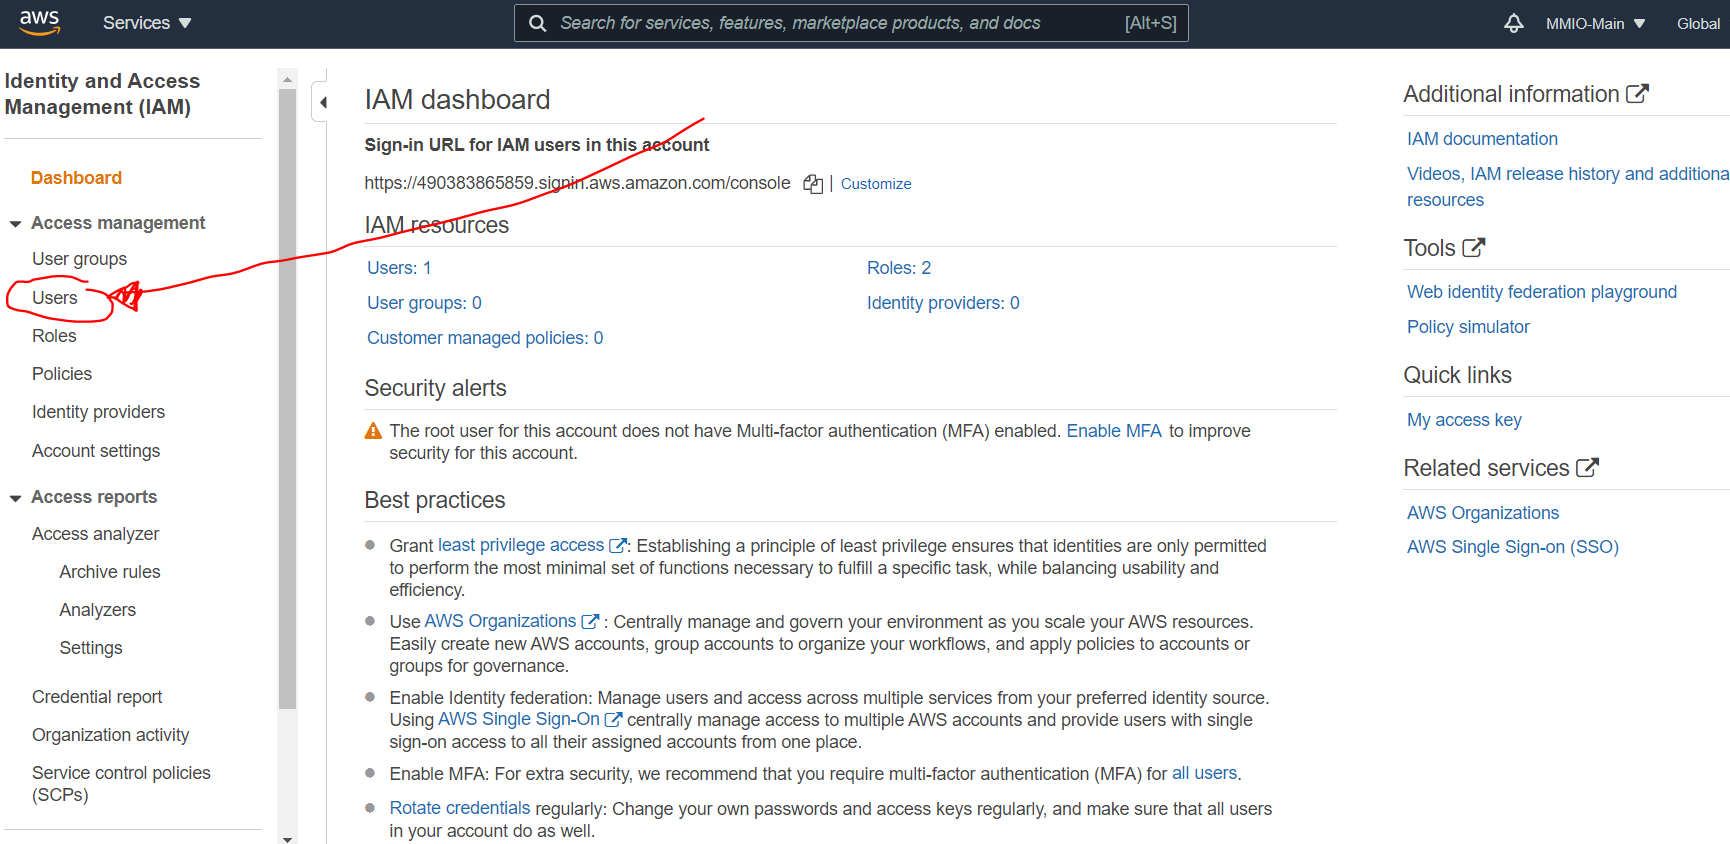
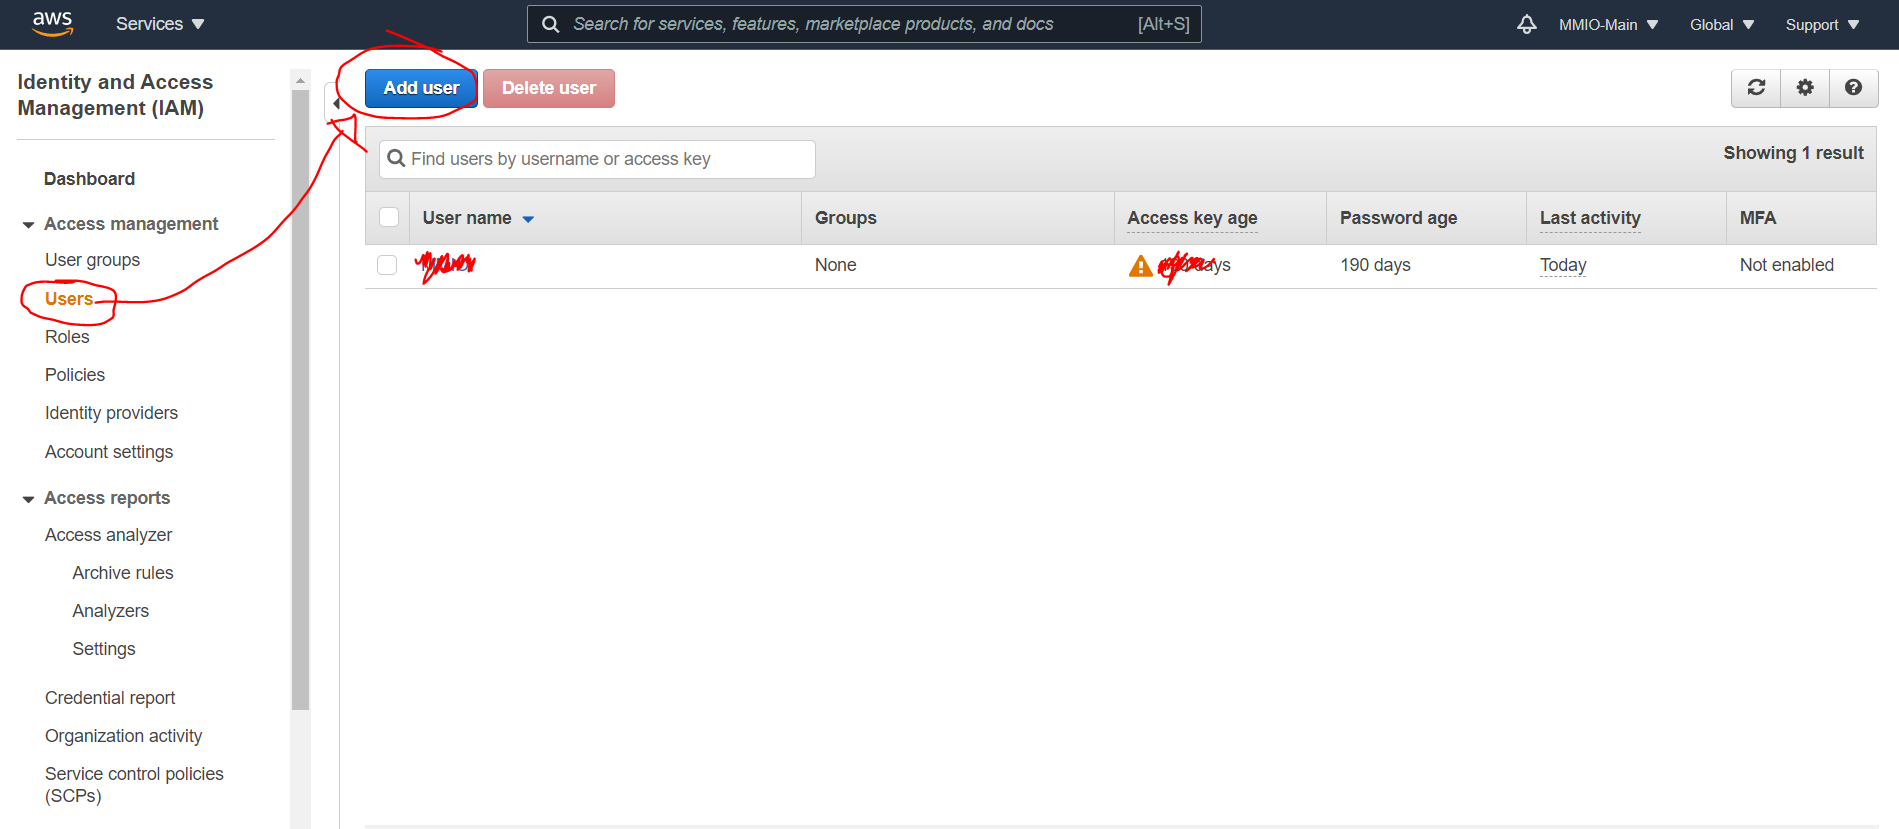
You will be redirected on the IAM dashboard.
Once on the IAM dashboard, click “Users”
When you see the “Add User” button, click it.
Add a new User Name → then enable the Programmatic access option → then click the “Next: Permissions” button

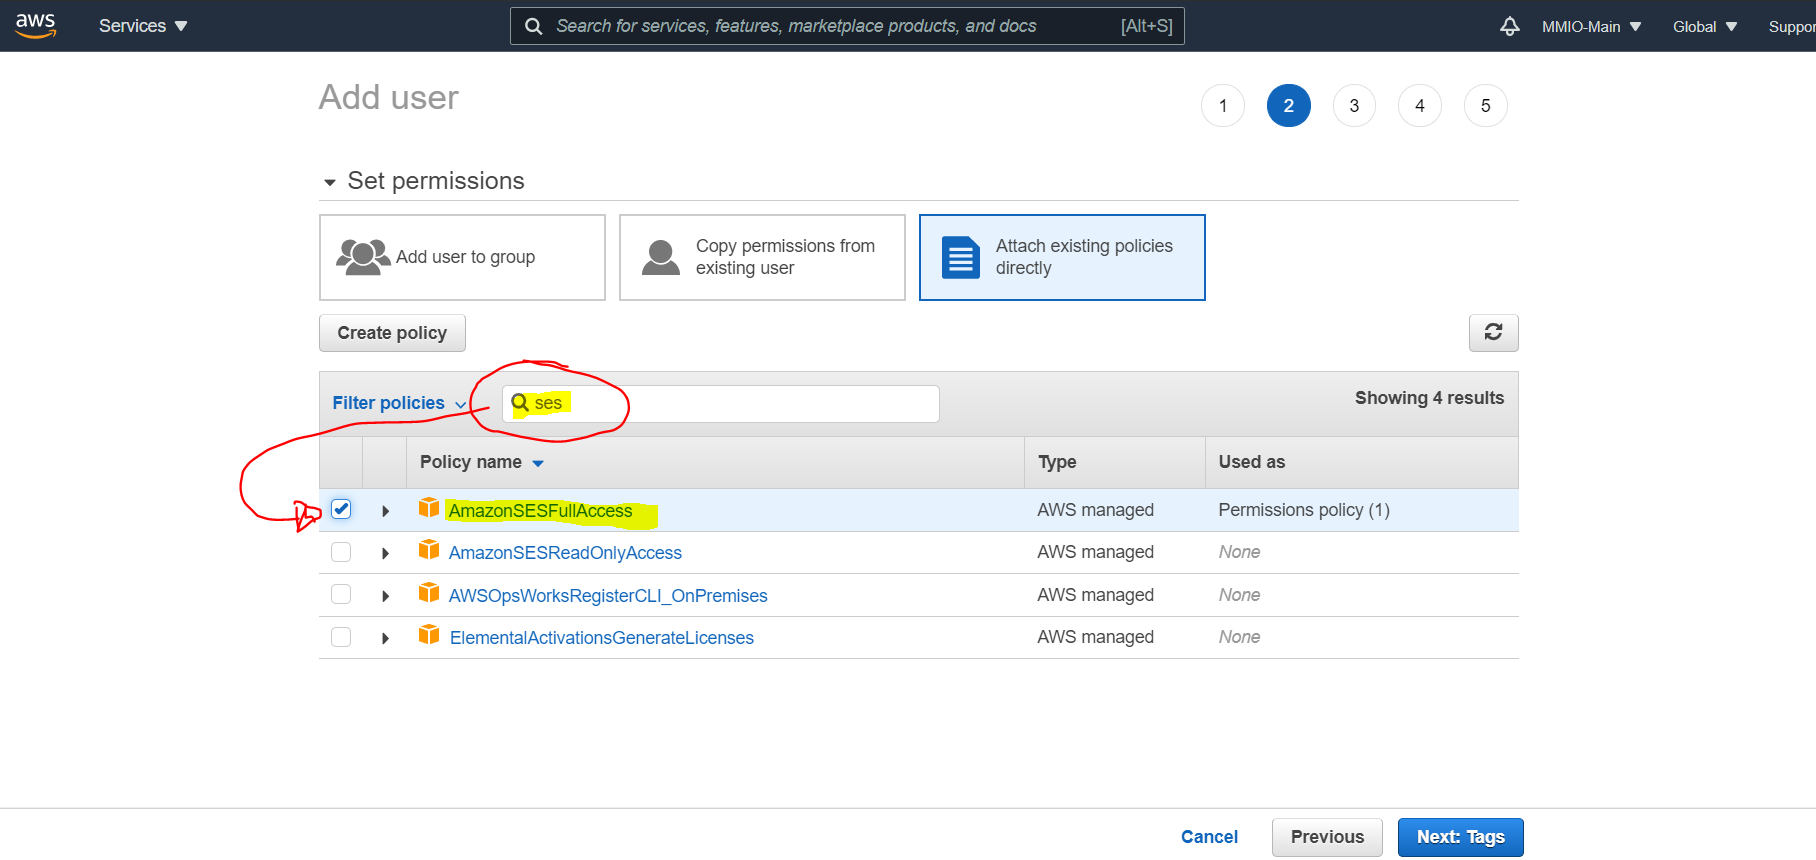
Then choose the “Attach Existing Policies” tab

What we are going to do here is we will be giving full access for 2 important to our newly created IAM user.
These features are “SES” and “SNS” full access.
So to start, let's search for “SES” → then enable the “AmazonSESFullAccess” permission.
Once we have enabled the full SES permission, we will then enable SNS full access permission.
See below:
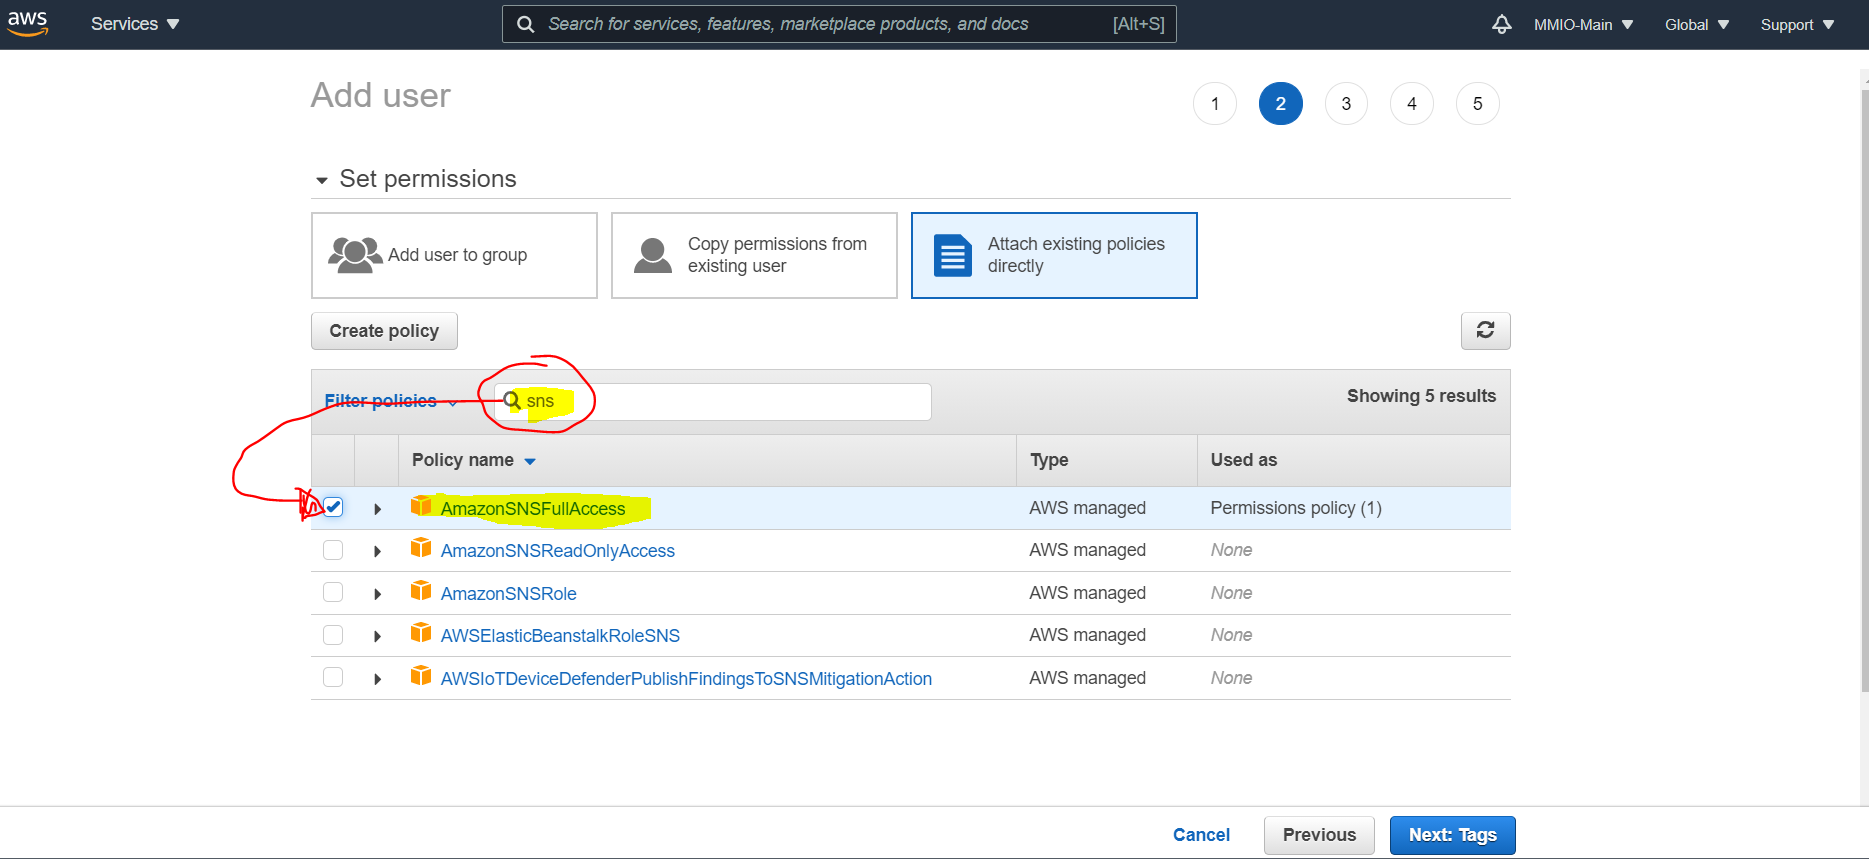
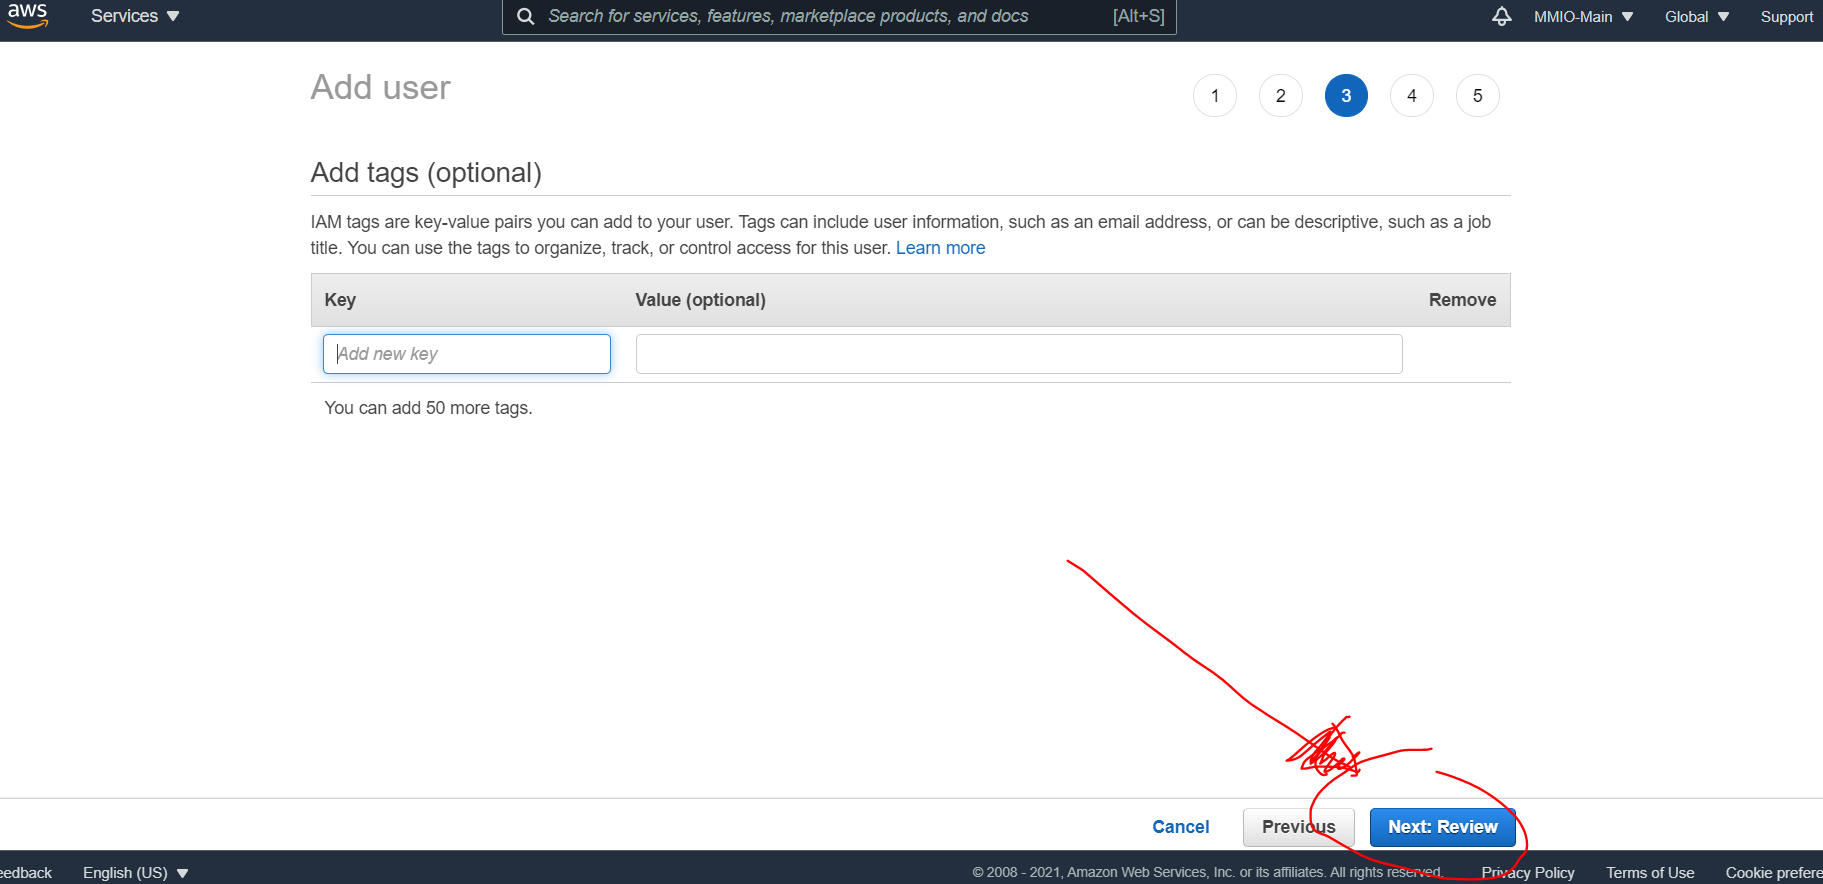
After we have enabled both SES and SNS full access permission, click “Next: Tags”

You can add tags here or you can skip. This is an optional step so we can go directly to the next step.
Click the “Next: Review” button
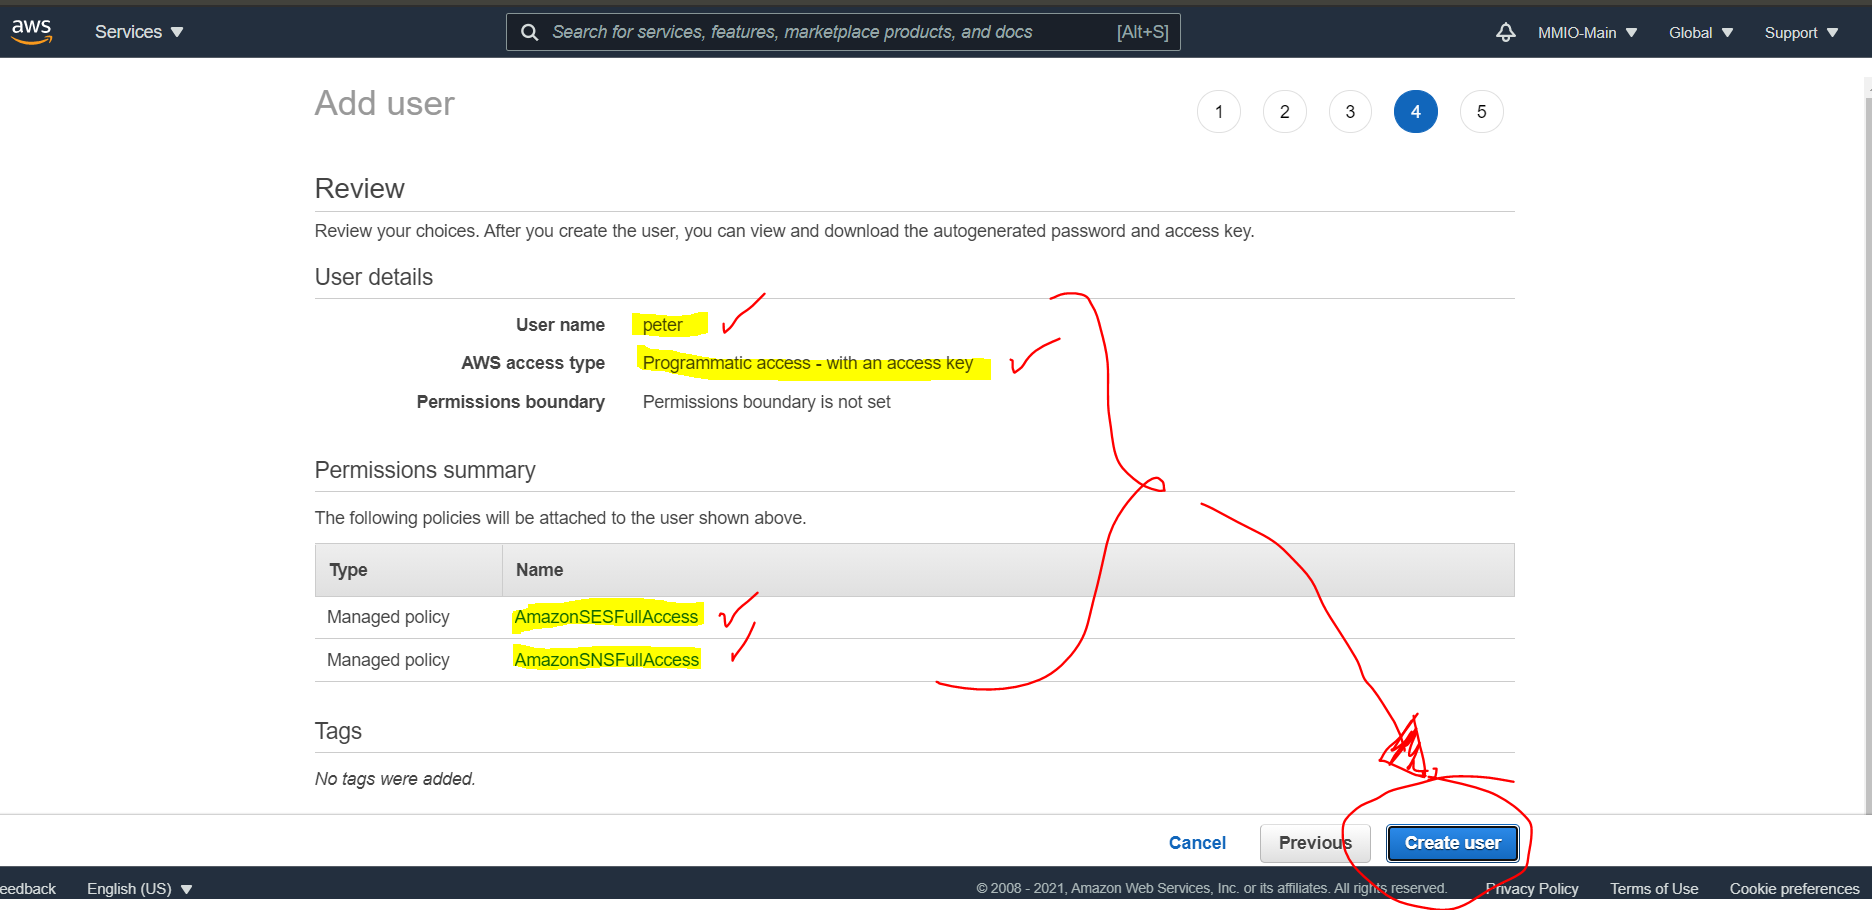
You can now review the capabilities we have added to our new user.
User name
Programmatic access
AmazonSESFullAccess
AmazonSNSFullAccess
Once everything is in order, click “Create User” button.
3. Get the “Access key” and “Secret access key”
Once our new user is created, it VERY IMPORTANT to download the CSV file so we can get the access key and secret key anytime as long as we have the CSV file.
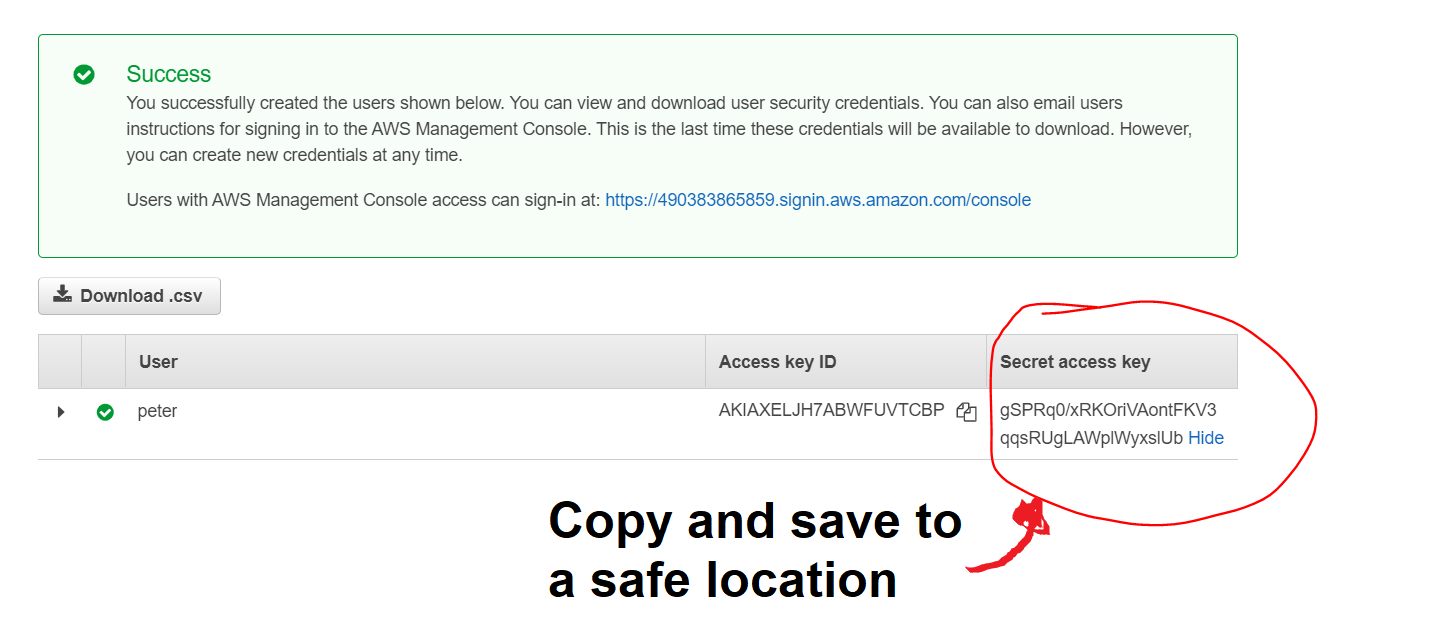
After download, copy the Access key and save temporarily to a “text” file → then click “Show” under the secret access key cell → and copy as well to safe location.
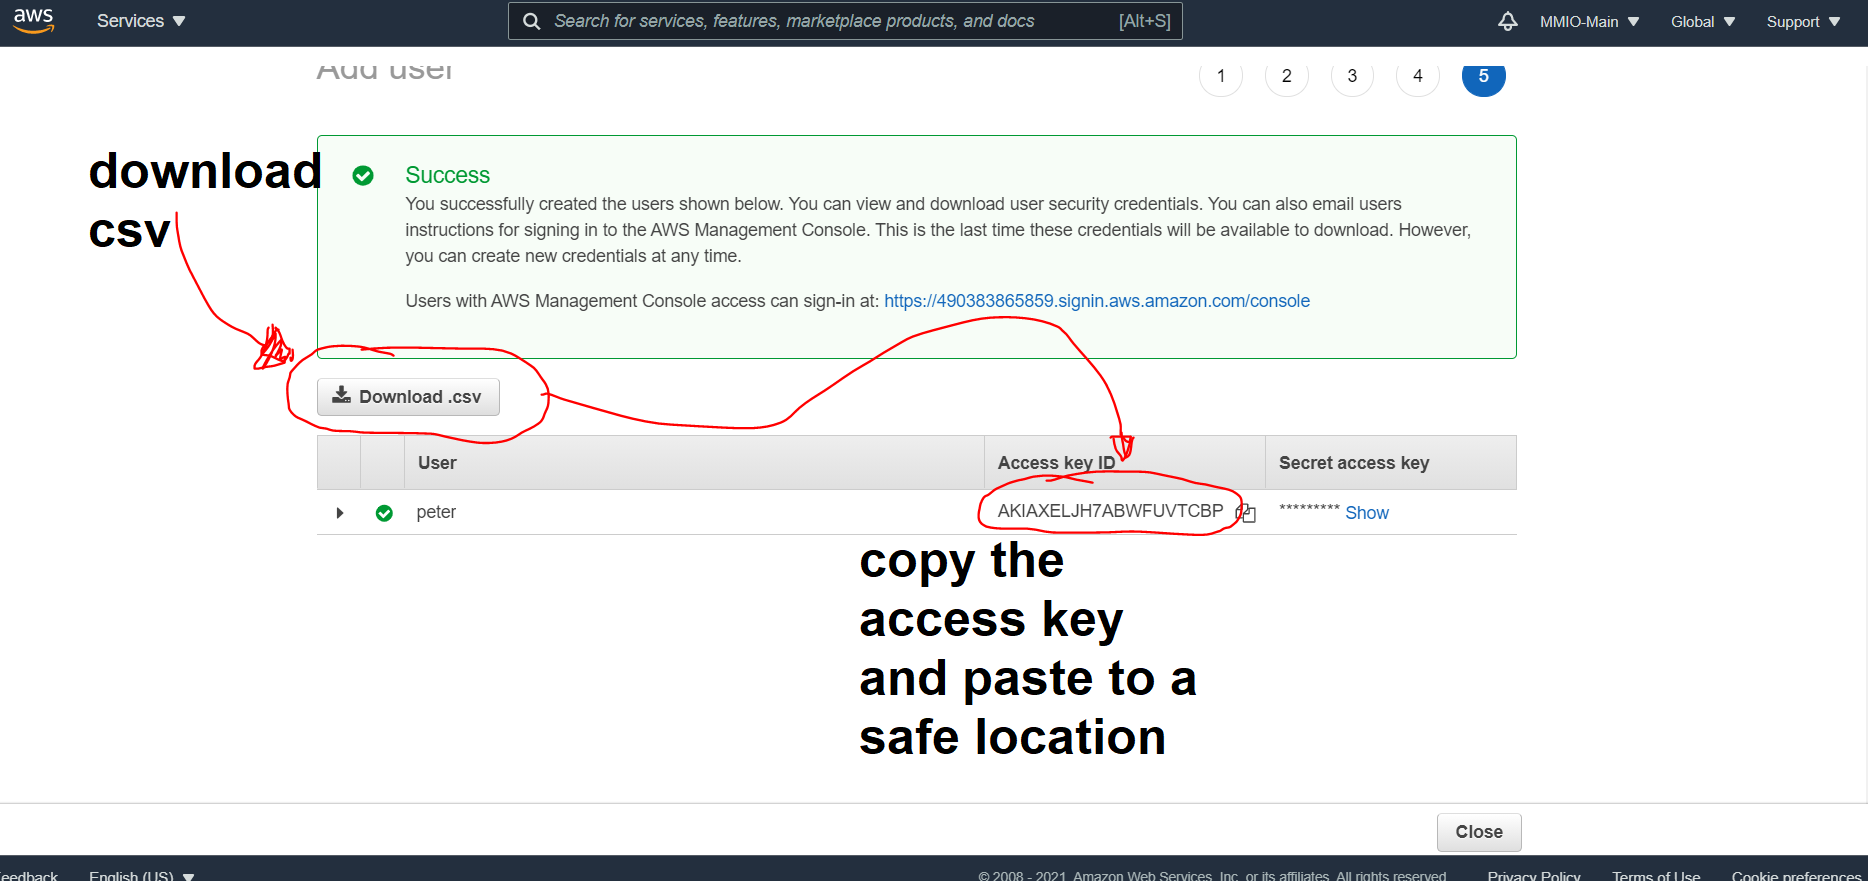
So we have these very important keys:
Access key → AKIAXELJH7ABWFUVTCBP
Secret access key → gSPRq0/xRKOriVAontFKV3qqsRUgLAWplWyxslUb
Now that we have both the access key and the secret access key, it now time to integrate our Amazon Web Services account to MMIO.
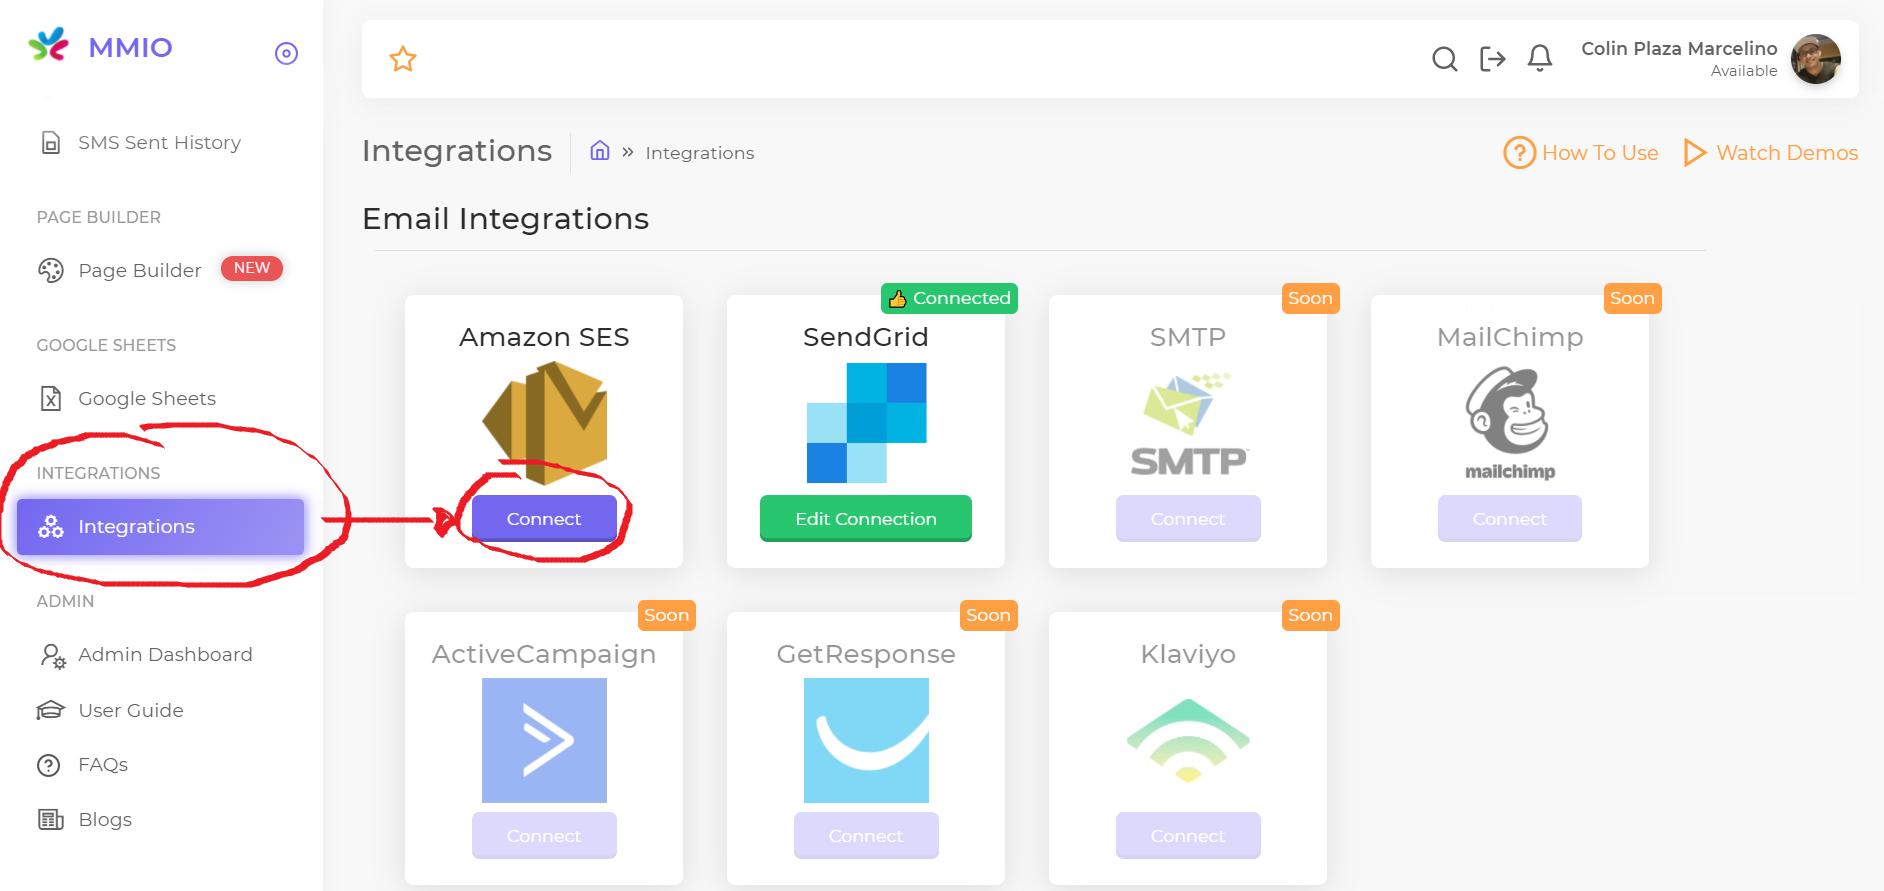
4. Enable the Integration in MMIO
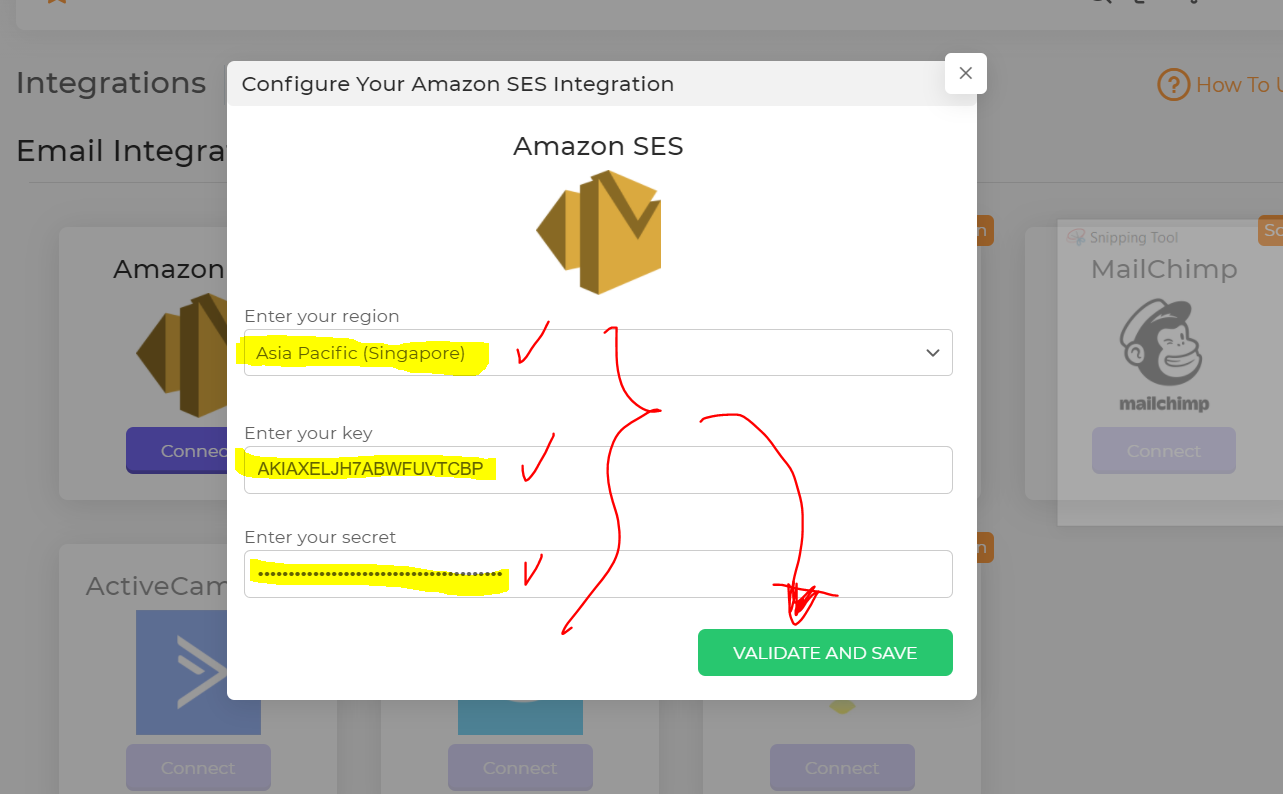
Login to your MMIO account → then go to Integrations → and Click “Connect” button under Amazon SES
Then configure the connection as follows:
Region → you can choose any region here, but it's best that you choose the once nearest to your country. For this example, we will choose “Asia Pacific (Singapore)”
key → enter your Access key here
secret → enter your Secret access key here
After completing the configuration, click “Validate and Save”
Once done correctly, you should be able to see the “Connected” notice above “Amazon SES” integration.
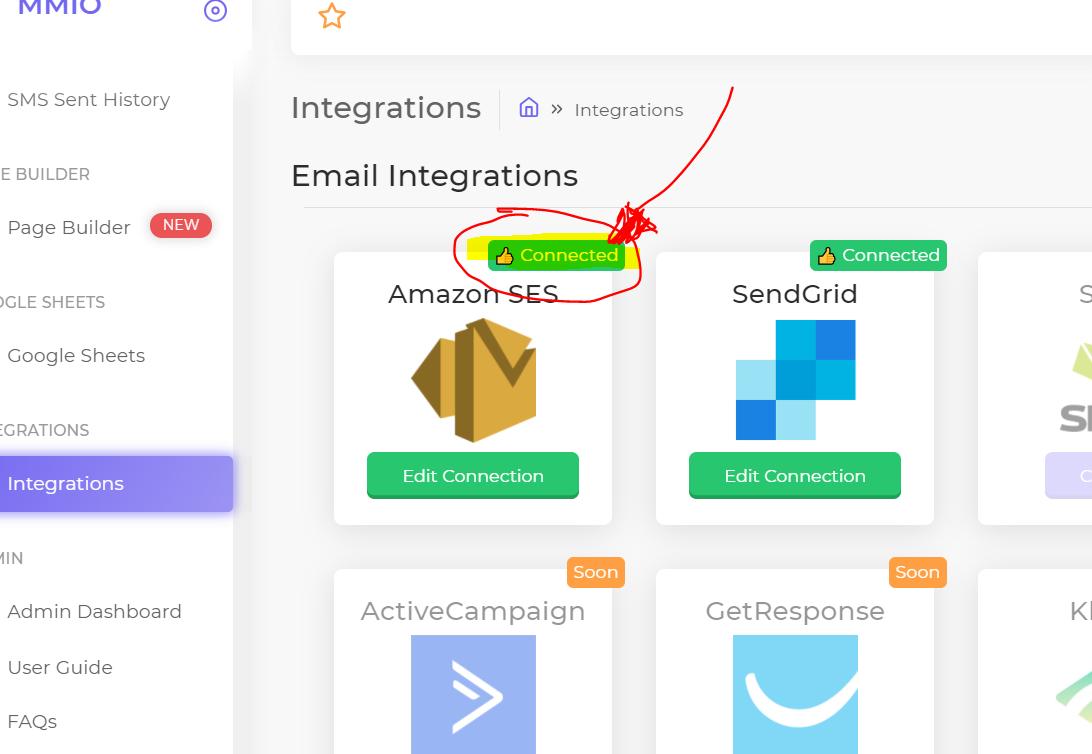
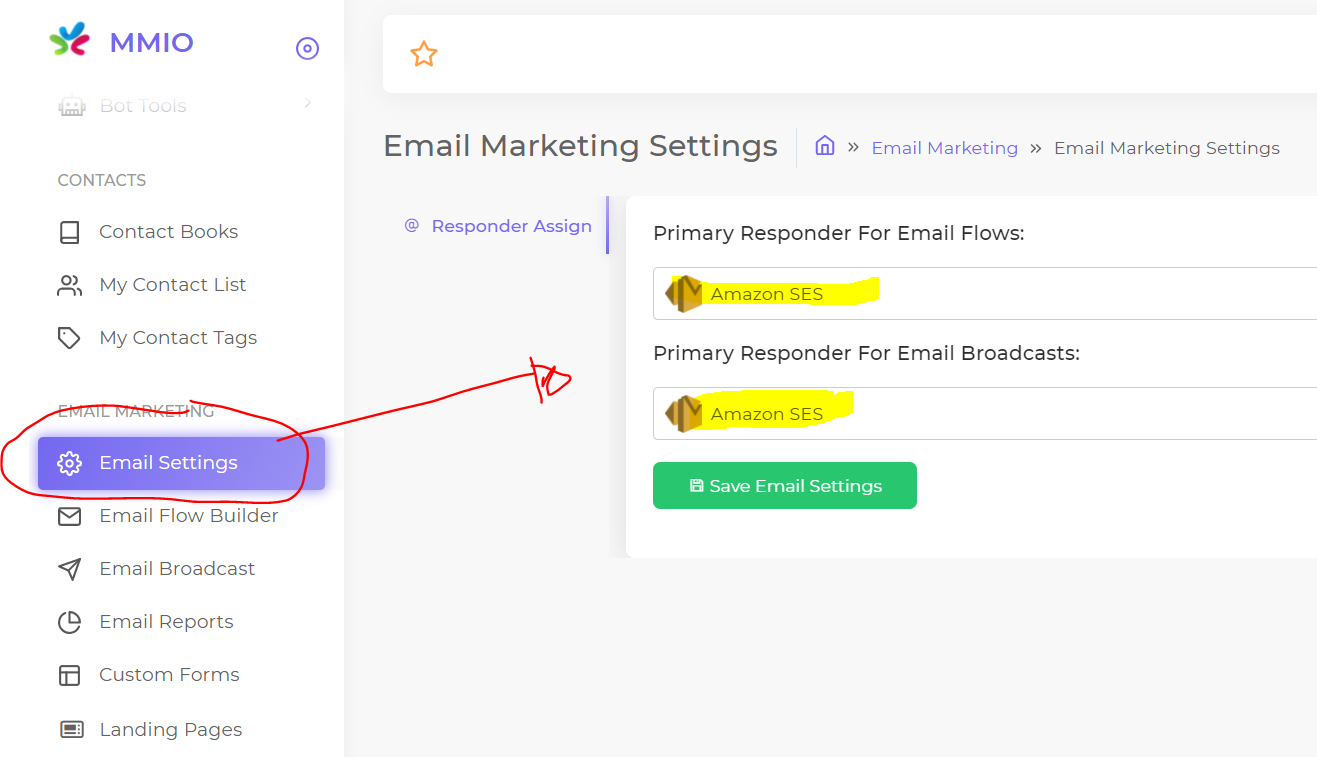
After this, go to your Email Settings and assign Amazon SES for your Email Broadcasts and Flows.
5. Requesting Product Access to our chosen Region (Optional but Highly Recommended)
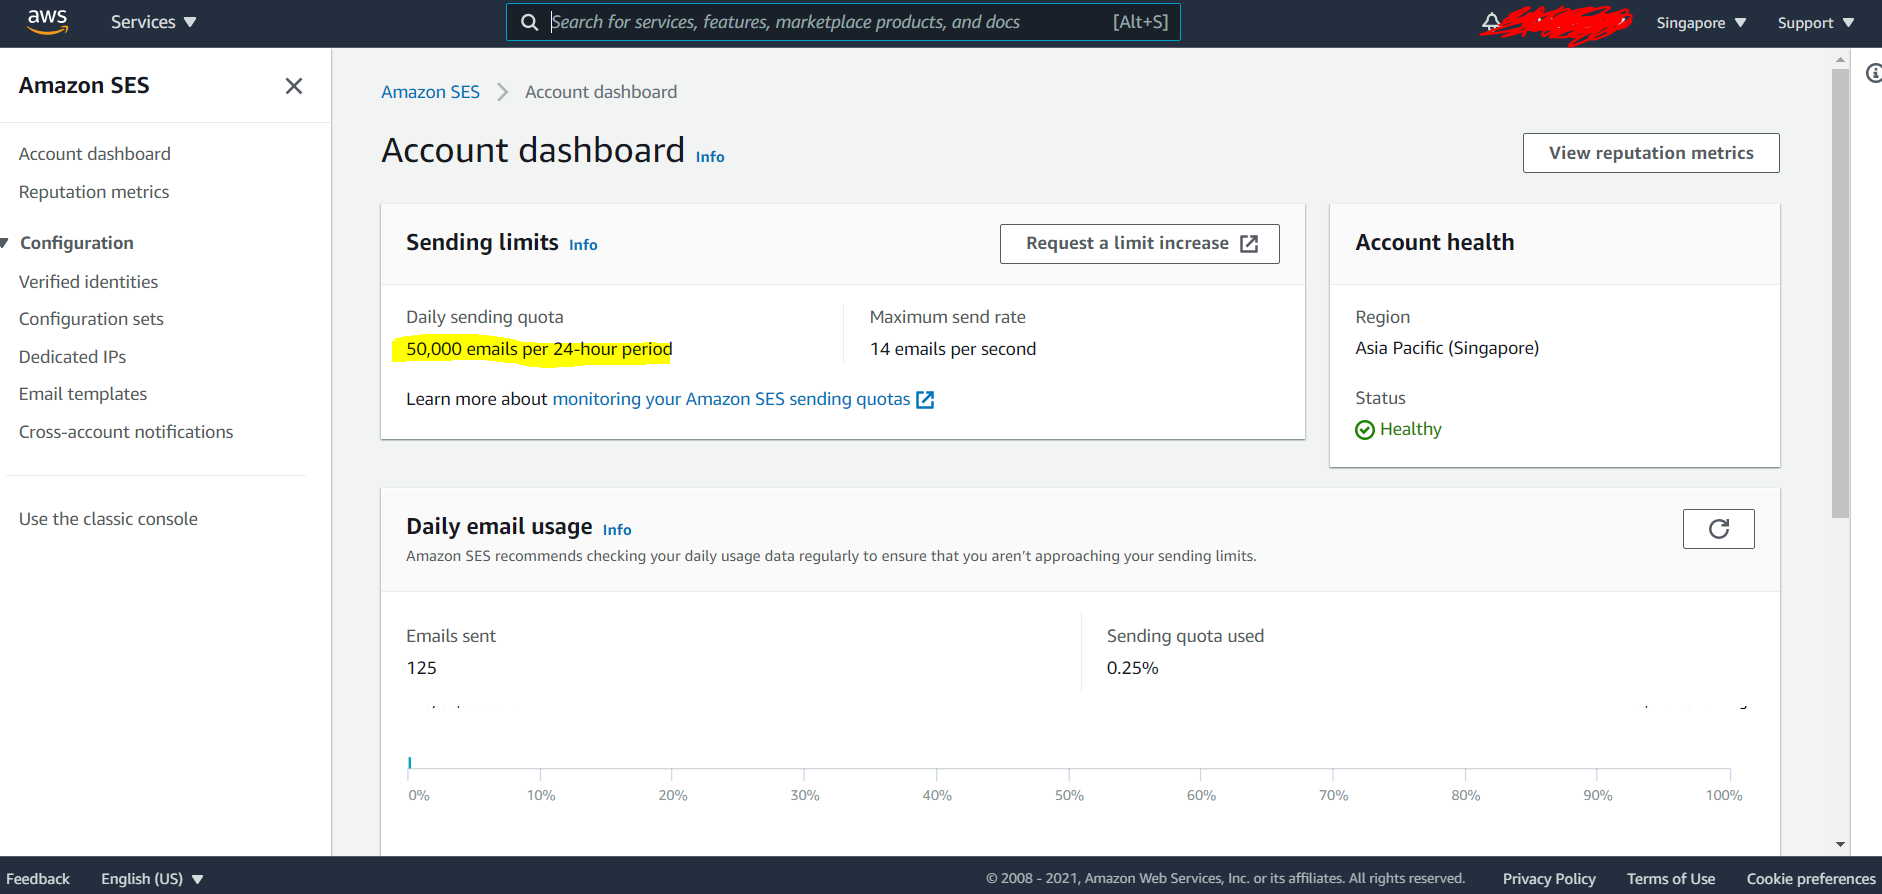
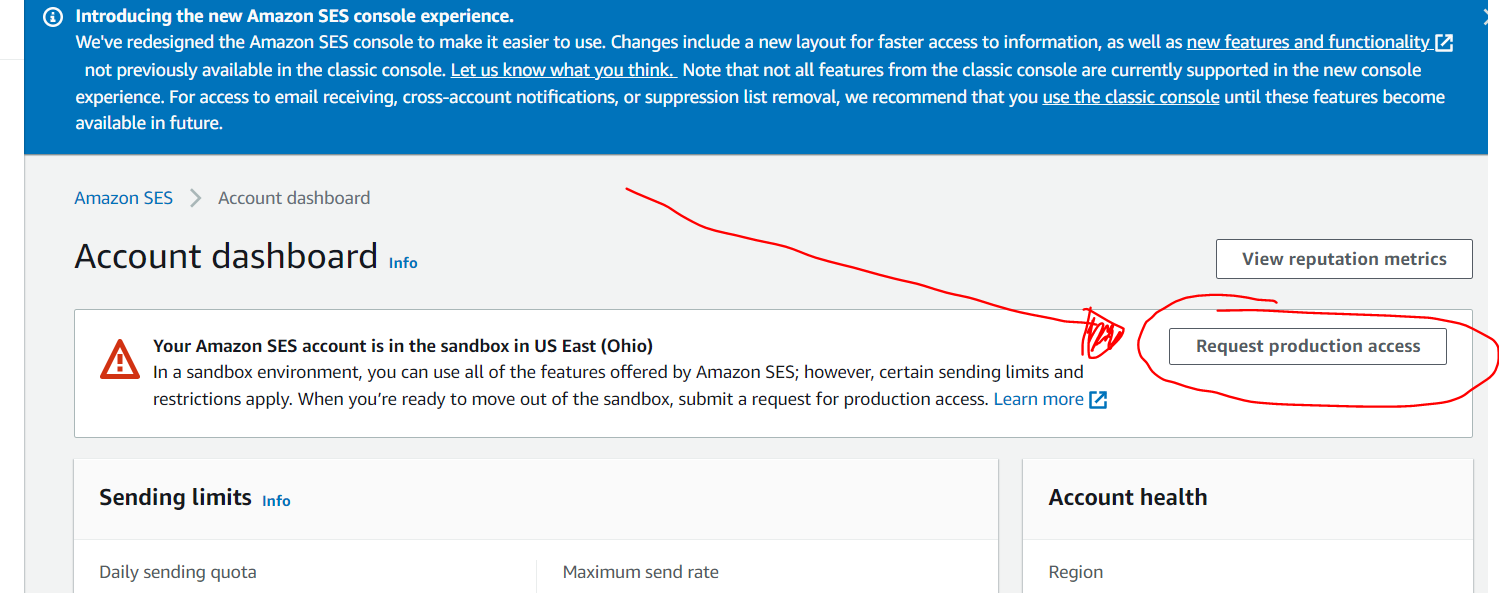
By default, our Amazon SES account on our chosen region is under “Sandbox"
It means that it's only limited to 200 emails per day and is not yet ready for production. Normally, this is enough if you are sending very limited emails a day.
But, If you need to send more than 200 emails per day, then you would need to request a “Production” ready status.
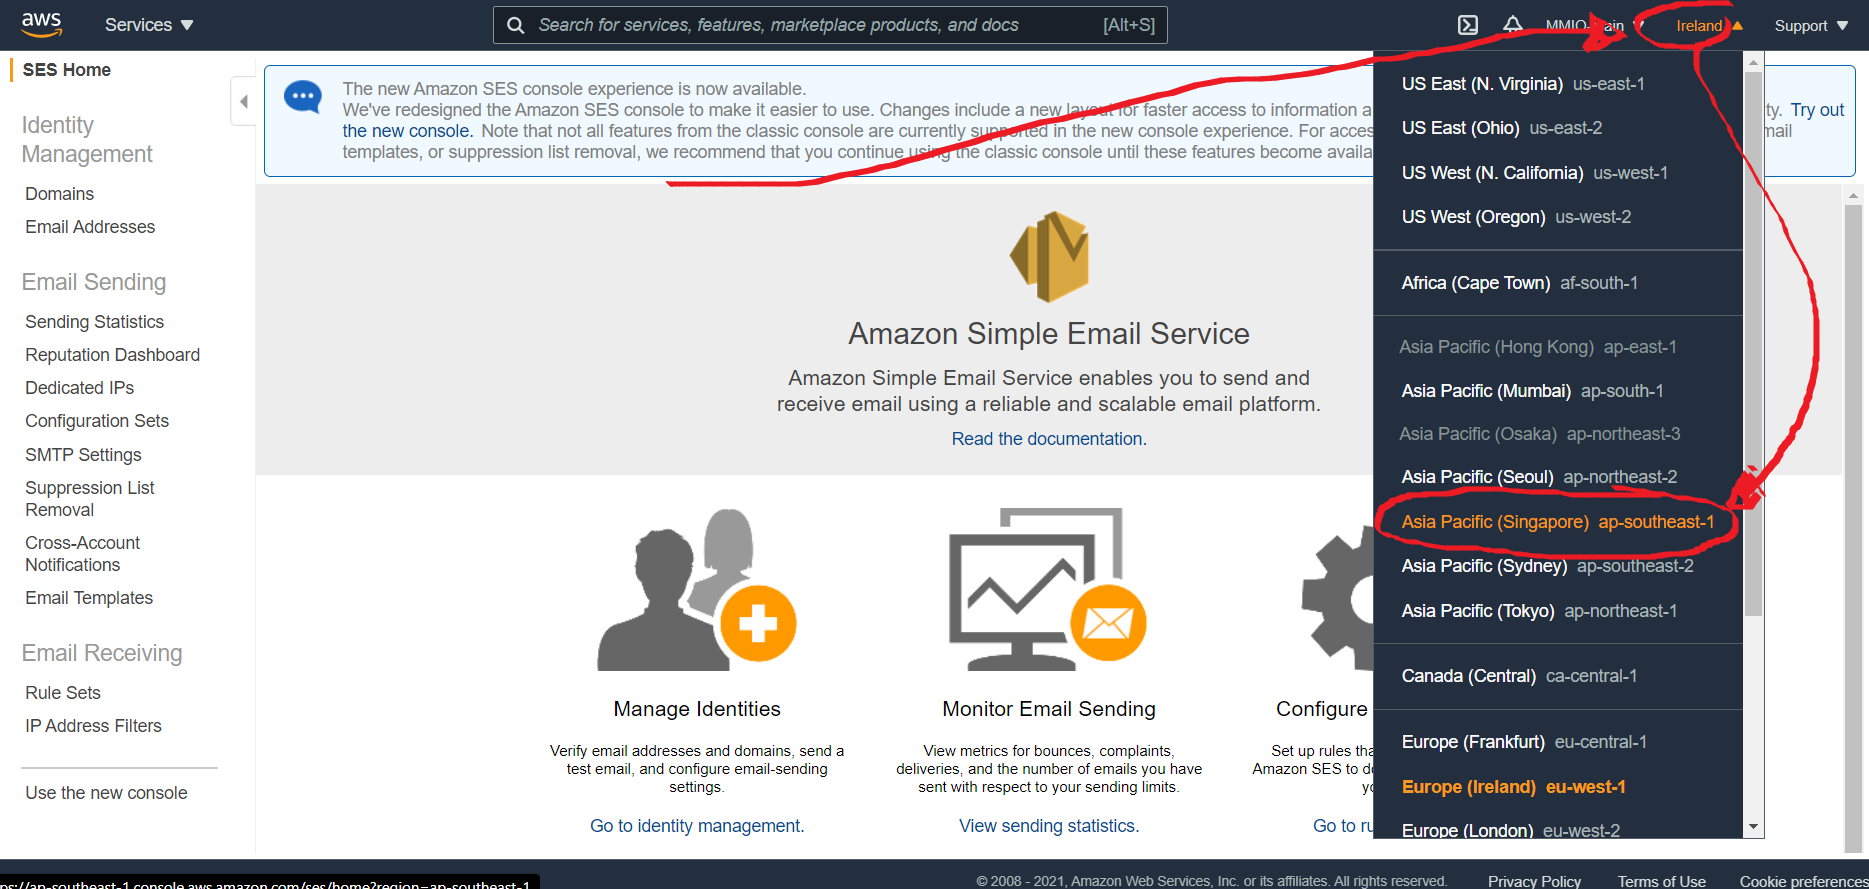
To request this status, go back to your Amazon Web Services account → and search “SES” on the navigation search box → then click “Simple Email Service” on the search result.
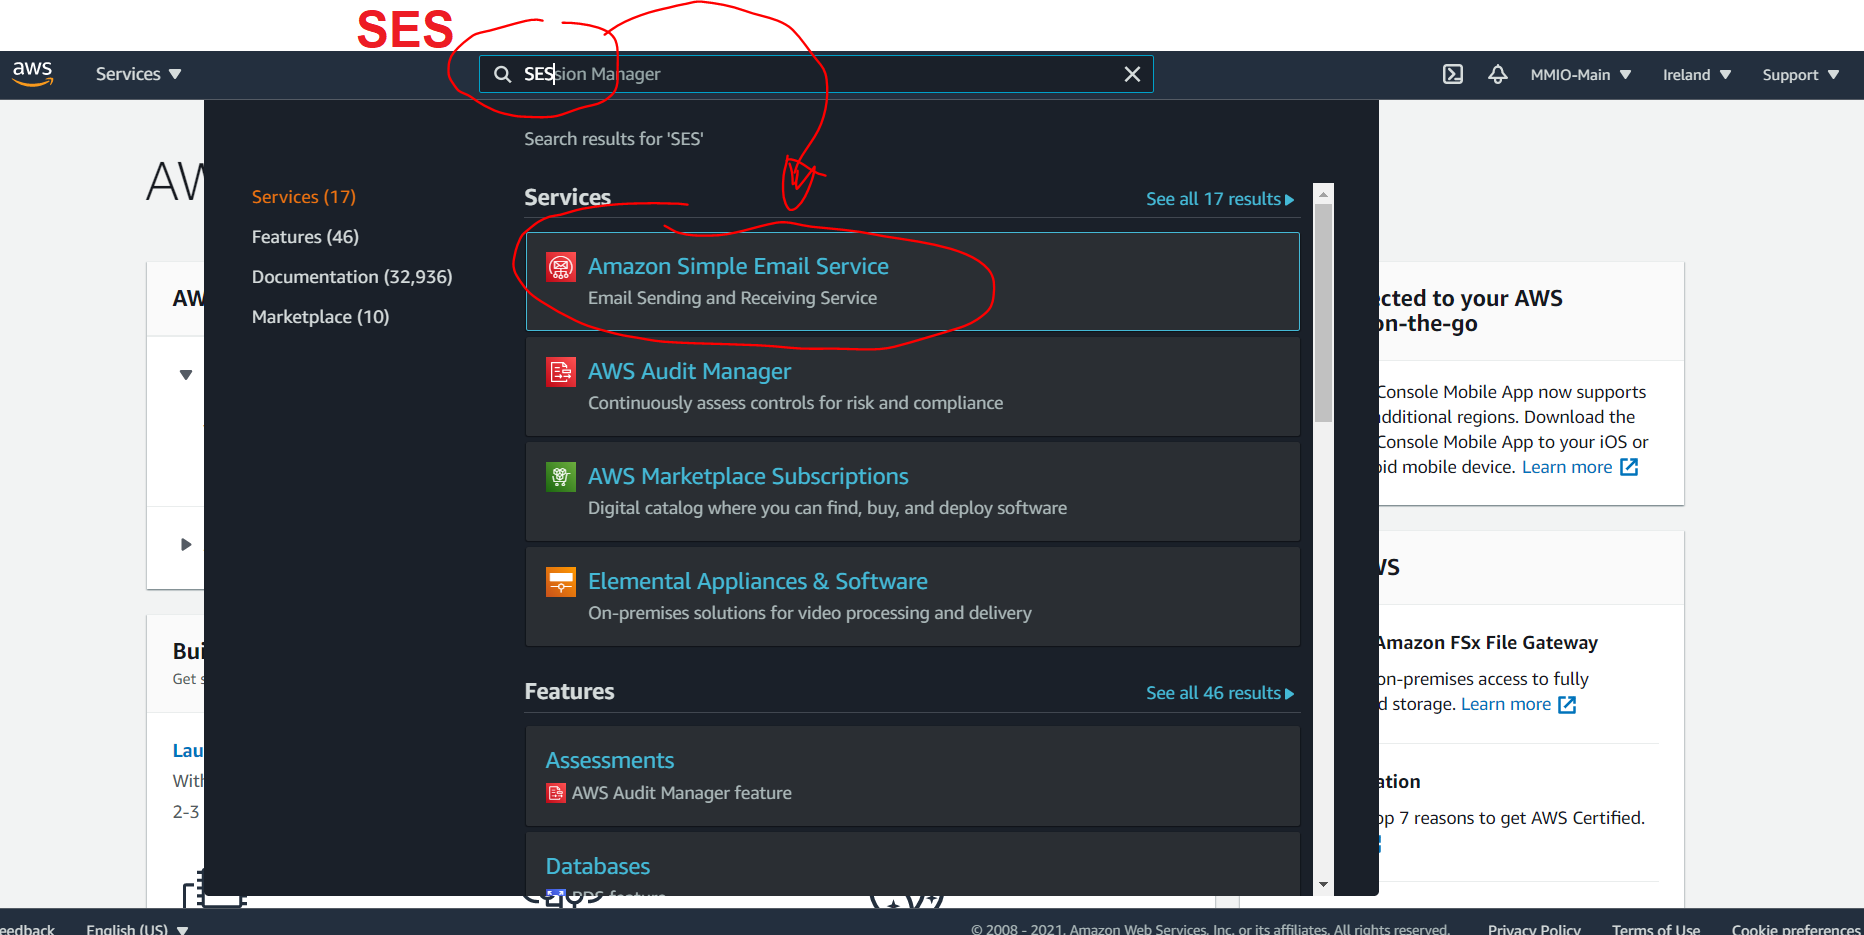
We will then be navigated to our SES dashboard.
VERY IMPORTANT! Make sure to choose the region we configured in MMIO
On this example, we chose “Asia Pacific (Singapore)” when we configured our MMIO integration, now we need to make sure that we set the region of our SES account to the same region.
Click the “Regions” dropdown and choose your configured region - in this example, “Asia Pacific (Singapore)”
After making sure that we are on the correct region, click “Request Production Access” button.
Then simply fill-up all the required fields on the Product Request form.
See sample below:
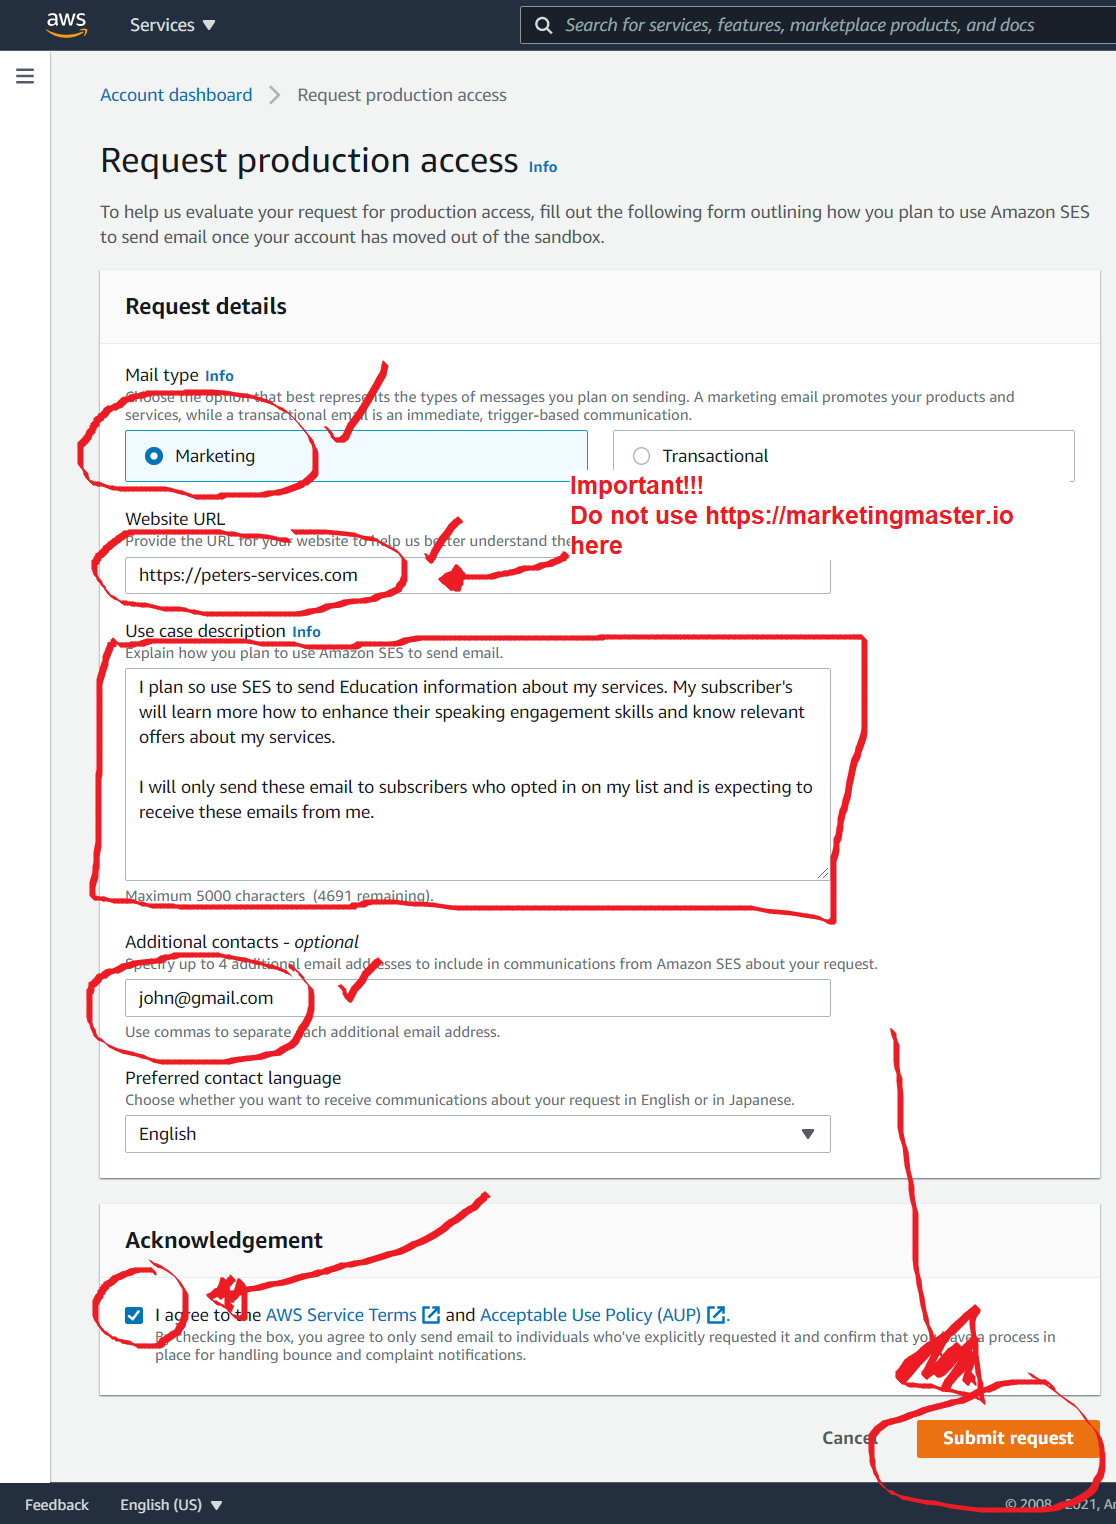
Sample user Case:
I plan so use SES to send Education information about my services. My subscriber's will learn more how to enhance their speaking engagement skills and know relevant offers about my services.
I will only send these email to subscribers who opted in on my list and is expecting to receive these emails from me.
After the form is completely fill-up and you have ticked the “Terms and Services” agreement, click the “Submit Request” button.
You should be able to see these notices on your dashboard:

To monitor your request status, simply go to “Support” drop down and click “Support Center”
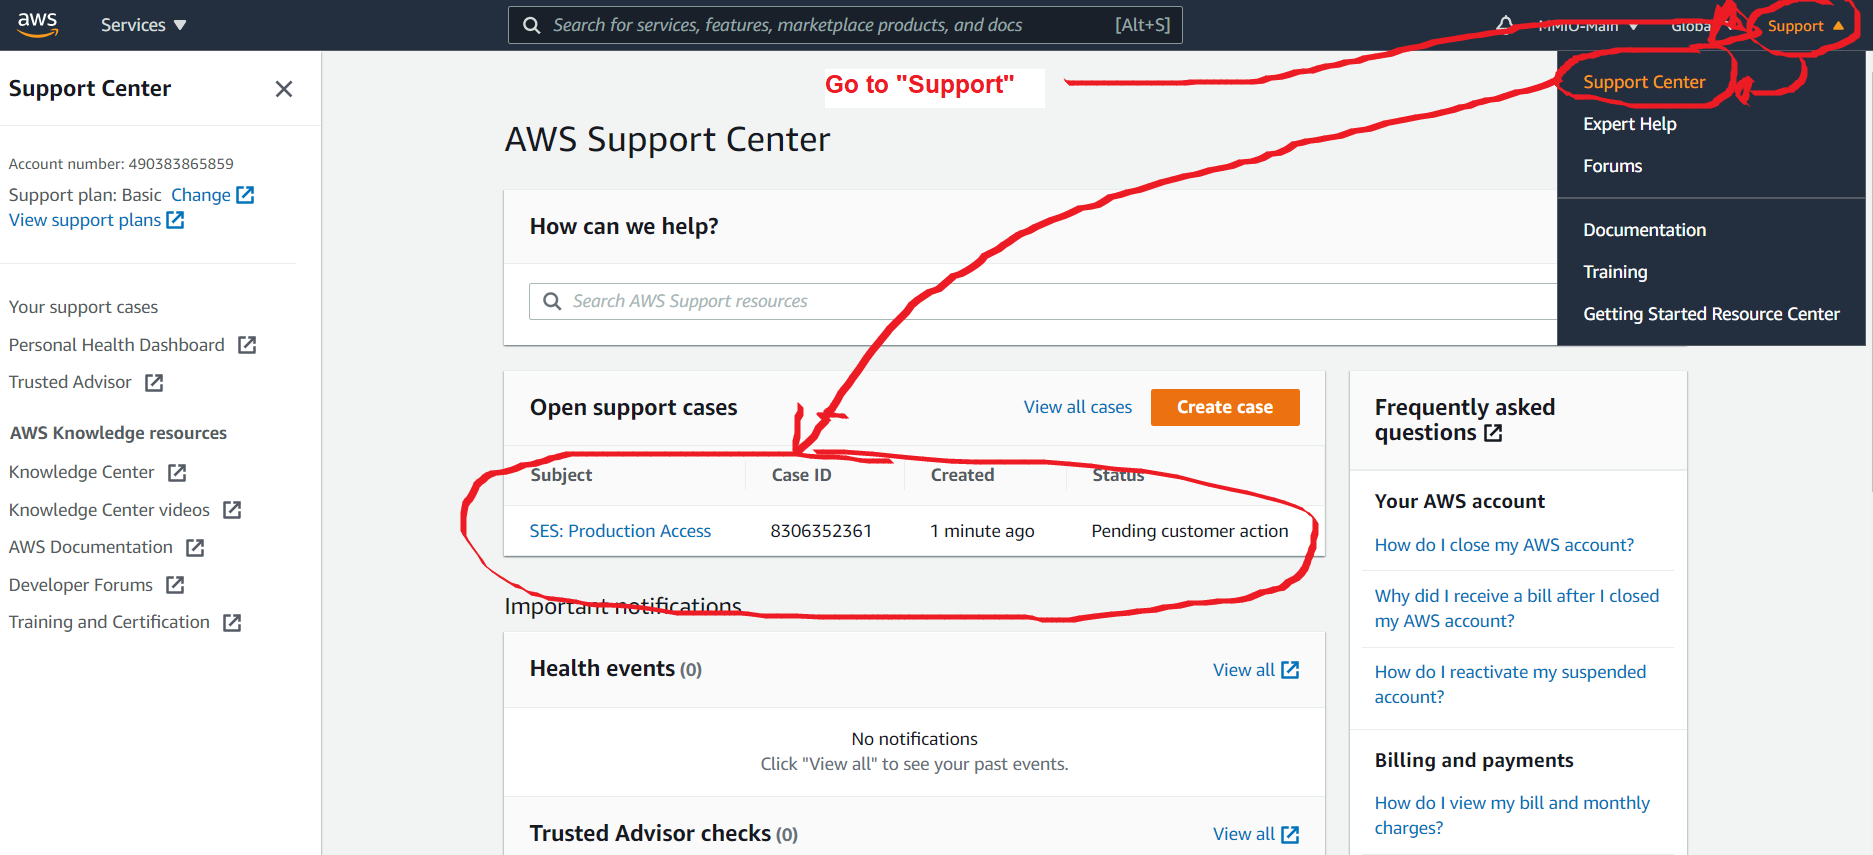
Check your email to see updated regarding your Product Request.
Once approved, you will see the limit increased on your SES dashboard for the chosen region.